


- Angular Tutorial 1: Getting Started
- Angular Tutorial 2: Building Blocks
- Angular Tutorial 3: Creating Components
- Angular Tutorial 4: Data binding
- Angular Tutorial 5: Component input and output
Getting started
Let's start with a fresh application to recap the usage of Angular CLI. We need to generate a new project using ng new. Then navigate inside its directory and run ng serve to launch the local development server on http://localhost:4200/.
If all goes well, you should be able to see something similar to this:
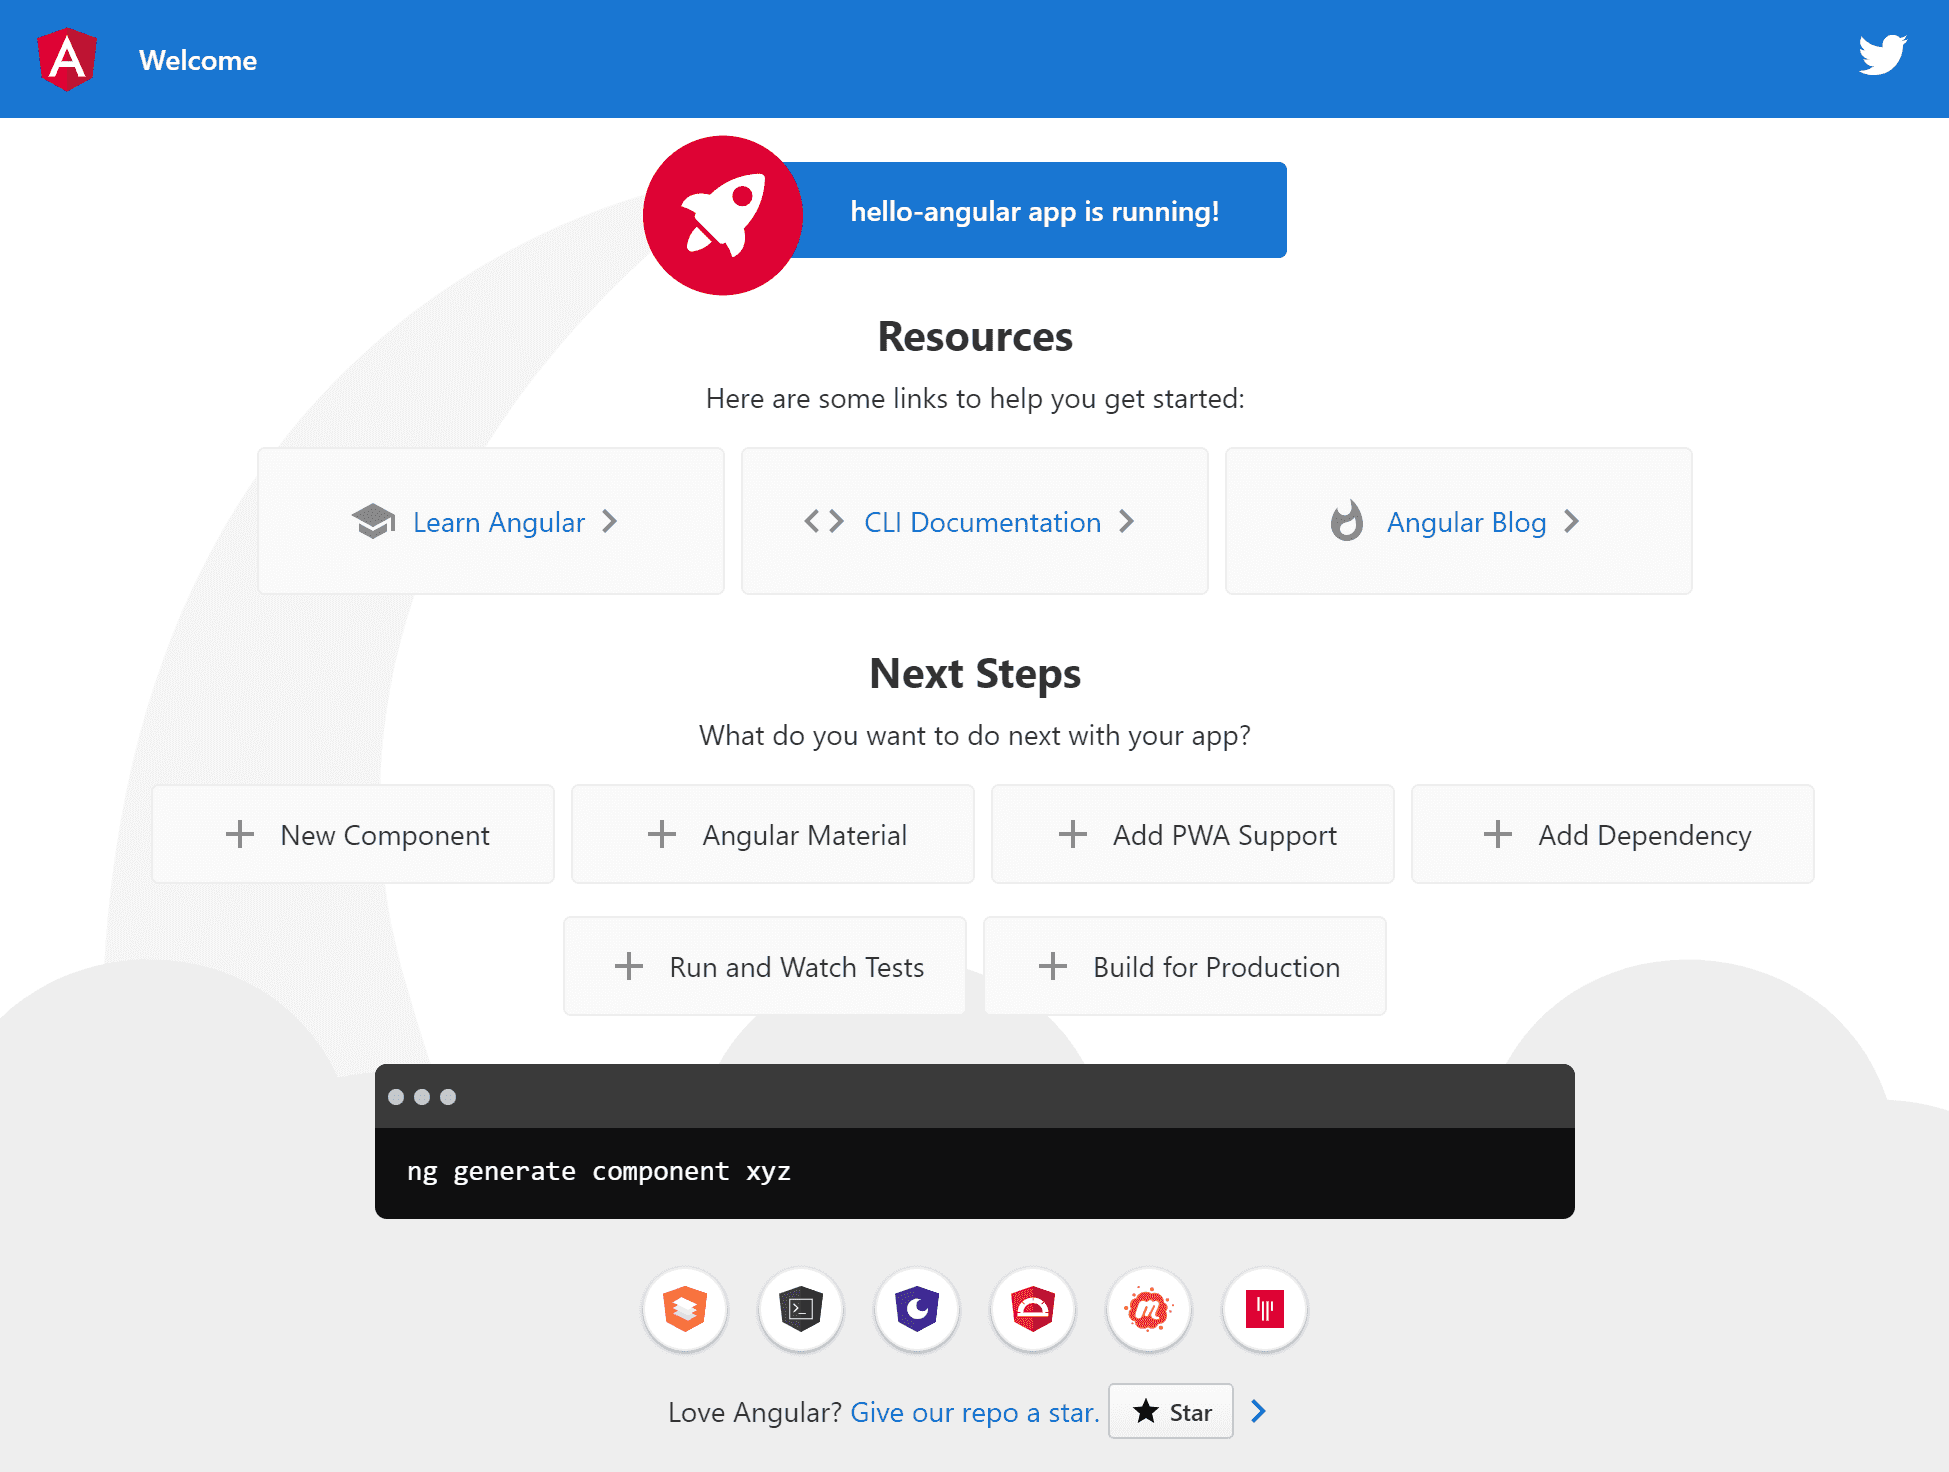
What you can see is the app.component. In the next section, we'll replace it with our own new component. So let's get started by deleting the existing app.component. You can remove all these four files.
Note that now your app won't compile. Don't worry, we'll fix that soon enough.
New component
Now let's create our first component called main. First, we'll need a Typescript file to contain our component. Start by creating main.component.ts in the src/app directory.
Each component is a Typescript class:
export class MainComponent {

}
@Component decorator
Now we need to provide additional metadata to the component, so Angular knows how to handle it. This is done using @Component decorator on the class level. Since this is not recognized by Typescript by default, we need to import it.
import {Component} from "@angular/core";

@Component()
export class MainComponent {

}
Selector
Much better, but still not enough. We need to pass some metadata to the @Component. You can put in a configuration object with various properties. Let's start with the selector.
import {Component} from "@angular/core";

@Component({
  selector: 'app-main'})
export class MainComponent {

}
A quick recap - selector is the name of the HTML tag, which represents our component. In this case we can use <app-main></app-main> to use our component in index.html.
Let's go there and replace <app-root></app-root> (the main component we previously deleted) with <app-main></app-main>.
<html lang="en">
  <head>
    <meta charset="utf-8">
    <title>HelloAngular</title>
    <base href="/">
    <meta name="viewport" content="width=device-width, initial-scale=1">
    <link rel="icon" type="image/x-icon" href="favicon.ico">
  </head>
  <body>
    <app-main></app-main>  </body>
</html>
Note that our component is called main, but the selector is app-main. Why is there the app- prefix? It is a good practice to have such prefix (can have a different value) for your custom components. This allows you to easily distinguish your own components' tags from ordinary HTML tags and avoid collisions. It also allows you to distinguish your components from any third-party components, which usually have their own prefix. You can even use a different prefix in each module.
Template
We have a component, but there is no HTML associated, which should be used for rendering it. Let's change that.
import {Component} from "@angular/core";

@Component({
  selector: 'app-main',
  template: '<h1>Hello Angular!</h1>'})
export class MainComponent {

}
As you can see, template is used to specify a string, which represents HTML used to render our component. For now, we specified just a simple H1 heading with a hard-coded title.
Updating app.module
Our component is now ready, but our project won't compile, and there is no output in the browser.
If you remember the previous post, you can guess what is wrong. Our module app.module.ts specifies which components should be recognized in index.html. And there is still the old app.component, which we deleted. Let's fix that. This is the current content of app.module.ts.
import { BrowserModule } from '@angular/platform-browser';
import { NgModule } from '@angular/core';

import { AppComponent } from './app.component';
@NgModule({
  declarations: [
    AppComponent  ],
  imports: [
    BrowserModule
  ],
  providers: [],
  bootstrap: [AppComponent]})
export class AppModule { }
We need to change all occurences of AppComponent to MainComponent, including the import. The new content should be the following:
import { BrowserModule } from '@angular/platform-browser';
import { NgModule } from '@angular/core';

import {MainComponent} from "./main.component";
@NgModule({
  declarations: [
    MainComponent  ],
  imports: [
    BrowserModule
  ],
  providers: [],
  bootstrap: [MainComponent]})
export class AppModule { }
Note that our component here is referred to as MainComponent. This name corresponds to the Typescript class we used at the beginning:
export class MainComponent {

}
Now if you save your files and go to http://localhost:4200/, you should see the following page:

That is the same HTML we specified in the template: '<h1>Hello Angular!</h1>'.
Expanding the template
Our component works, but it is rather simple. Let's expand its template a bit.
@Component({
  selector: 'app-main',
  template: `
    <h1>Hello Angular!</h1>
    <p>This is my very first component! How cool is that?</p>    <p>It does not do much at the moment and it looks ugly.</p>    <p>Stay tuned for upgrades!</p>  `
})
We added just a few lines of HTML for now, but in real applications, the template can become very big quickly.
In such case, it is not very nice to have a big chunk of HTML in your component's Typescript file. It is harder to read and edit. Fortunately, we can move this template to a separate file. It is actually common practice unless the template is really small.
Let's create a new file in the same directory called main.component.html and copy our template inside.
Now we need to change template to templateUrl and give it a path to our new HTML file.
@Component({
  selector: 'app-main',
  templateUrl: './main.component.html'})
That's much cleaner. We have our template neatly separated from our Typescript file.
Adding some styling
Our component works, but it does not look very pretty. We have no styling at all. Fortunately, we can easily add some with styles.
@Component({
  selector: 'app-main',
  templateUrl: './main.component.html',
  styles: [`
    h1 {
      color: darkblue;
      font-family: sans-serif;
    }
  `]
})
Please note that styles is actually an array of strings rather than a single string.
Same as with the HTML template in our previous example, this is not very clean to have styles directly in your Typescript file, especially if they get longer.
Similarly to extracting HTML to a separate file, you can do the same with styles. Let's create a file called main.component.scss and move our styles inside. Then we can link it using styleUrls.
@Component({
  selector: 'app-main',
  templateUrl: './main.component.html',
  styleUrls: ['./main.component.scss']})
Generating components
We managed to create our first component, but it was not very easy and convenient. Fortunately, Angular CLI allows you to create new components automatically. Just navigate in your terminal to the directory where you want your component to be created (let's use src/app/ for now) and run the following command:
ng generate component component-nameThe last parameter component-name is the name of the component to be generated. You can achieve the same using a shorter syntax ng g c component-name.
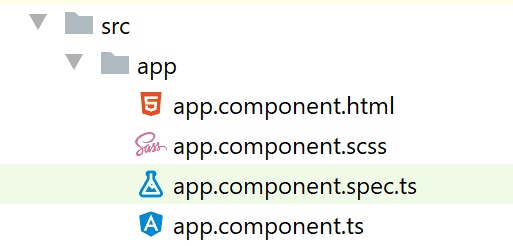
This command creates a new directory with the name of your component and inside you'll find:
- Typescript component class
- HTML template
- Stylesheet file
- Unit test file (
.component.spec.ts)
All the files are already linked together. What's more, your new component gets automatically added to the app.module.
Nesting components
We currently have just one component in our app. In real applications, this is rarely the case. Usually, you have many components, which you combine together to create the desired output.
You often have one root component in your index.html, and the rest of the components are nested inside. The nesting can be multiple levels deep - that means you can have component inside a component inside another component. Also, components are reusable and can be used multiple times.
Adding nested component
Let's try nesting in practice. First, we'll need a new component called footer, which we'll and into our main component. You already know that Angular CLI can help us here a lot:
ng generate component footerThe component was generated for us and also automatically registered in app.module.ts.
@NgModule({
  declarations: [
    MainComponent,
    FooterComponent  ],
  imports: [
    BrowserModule
  ],
  providers: [],
  bootstrap: [MainComponent]
})
What's important is that the bootstrap section still contains only MainComponent as it is the only component, which will be present in index.html. But note that our FooterComponent was added to the declarations section. That's important. All the components we use in our app (no matter whether they are used directly in index.html) need to be in this section, so Angular can recognize them.
Customizing footer
The HTML template of our new component, has already some content generated in footer.component.html. Let's change it to something more meaningful:
<hr>
<div class="footer">
  Author: John Doe, © 2020
</div>
We can also add some styling to footer.component.scss:
.footer {
  color: gray;
}
Adding a footer to the MainComponent
Now let's inspect the footer.component.ts file, which was generated for us.
@Component({
  selector: 'app-footer',  templateUrl: './footer.component.html',
  styleUrls: ['./footer.component.scss']
})
We need to know what selector was generated for us so that we can use it later. It is app-footer, so we can use <app-footer></app-footer> tag to represent our new component.
Now we want to nest the footer component in our MainComponent. We need to add it to the HTML template of the MainComponent, which is in file main.component.html. Let's add our new tag there to the bottom.
<h1>Hello Angular!</h1>
<p>This is my very first component! How cool is that?</p>
<p>It does not do much at the moment and it looks ugly.</p>
<p>Stay tuned for future upgrades!</p>
<app-footer></app-footer>
Our latest changes should be reflected in the browser. The footer component is nested at the bottom of our original MainComponent.

What we've learned
Components are basic building blocks of Angular applications. They are encapsulated, can be reused and nested in each other.
You can easily create new components using Angular CLI with:
ng generate component component-nameAfter creating a new component, you need to register it in your module in the declarations section. Only components used directly in your index.html need to be registered in the bootstrap section.
Component metadata is specified using @Component decorator on the class level in your .component.ts file.
Each component needs a selector, which defines an HTML tag, that can represent that component. It is useful to have a prefix for your components for better clarity and avoiding collisions.
Then each component also needs an HTML template. It can be directly in your TS file using template, but it is often preferred to have it separately in a file using templateUrl.
It is very similar with styling. Although you can have styles directly in your TS with styles, it is preferable to extract them in their own file(s) using styleUrls.
What's Next
In the next part, we'll cover Data Binding, which is useful for synchronizing data in and out of components and creating and handling events.
- Angular Tutorial 1: Getting Started
- Angular Tutorial 2: Building Blocks
- Angular Tutorial 3: Creating Components
- Angular Tutorial 4: Data binding
- Angular Tutorial 5: Component input and output
