


The traditional way
In the previous article, we created a simple Hello World application. Just a quick refresher - the code looked like this.
@Override
public void start(Stage primaryStage) throws Exception {
    primaryStage.setTitle("Hello world Application");
    primaryStage.setWidth(300);
    primaryStage.setHeight(200);

    InputStream iconStream = getClass().getResourceAsStream("/icon.png");
    Image image = new Image(iconStream);
    primaryStage.getIcons().add(image);

    Label helloWorldLabel = new Label("Hello world!");
    helloWorldLabel.setAlignment(Pos.CENTER);
    Scene primaryScene = new Scene(helloWorldLabel);
    primaryStage.setScene(primaryScene);

    primaryStage.show();
}
You can see that the whole UI is assembled in Java code. Now, this is a very simple example, but as your application gets more complex and you introduce multiple levels of nested layouts and many components, the resulting code can be very hard to read. However, that's not all - the same class has code, which is responsible for structure, visuals, and behavior at the same time.
The class clearly does not have a single responsibility. Compare this, for example, with web front-end, where each page has neatly separated concerns:
- HTML is structure
- CSS is visuals
- JavaScript is behavior
Introducing FMXL
All right, having all the code in one place is not a good idea. You need to structure it somehow, so it is easier to understand and more manageable.
There's actually a lot of design patterns for that. Usually, you would end up with a variation of Model-View-Whatever - that is something like Model View Controller, Model View Presenter, or Model View ViewModel.
You can spend hours discussing the pros and cons of different variants - let's not do this here. What's more important is that with Java Fx, you can use any of them.
It's because, in addition to the procedural construction of your UI, you can use declarative XML markup.
It turns out XML's hierarchical structure is a great way to describe a hierarchy of components in the user interface. HTML works pretty well, right?
This XML format specific to JavaFX is called FXML. Here you can define all your components and their properties and link it with a Controller, which is responsible for managing interactions.
Loading FXML files
So how can we change our startup method to work with FXML?
FXMLLoader loader = new FXMLLoader();
URL xmlUrl = getClass().getResource("/mainScene.fxml");
loader.setLocation(xmlUrl);
Parent root = loader.load();

primaryStage.setScene(new Scene(root));
primaryStage.show();
Here root represents the root component of your user interface, the other components are nested inside.
The load method has a generic return value, so you can load a more specific type than Parent. Then you can access component-specific methods. However, it makes your code more fragile. When you change your root component type in your FXML, the application will fail at runtime, not compile time. That's because now there is a mismatch in type declared in your FXML and in your Java FXML Loader.
Creating the FXML file
Now we know how to load an FXML file, yet we still need to create it. It needs to have extension .fxml. If you have a Maven project, you can put it in the resources folder or the FXMLLoader can load an external URL.
After we create the file, we need XML declaration on the first line:
<?xml version="1.0" encoding="UTF-8"?>Imports
Before we can add individual components to our file, we need to make sure that they are properly recognized. That means adding import statements. This is very similar to import in Java classes. You can import individual classes or use wildcards as usual. Let's see an example of import section:
<?import java.lang.*?>
<?import java.util.*?>
<?import javafx.scene.*?>
<?import javafx.scene.control.*?>
<?import javafx.scene.layout.*?>
The good news is that instead of manually adding all of them, your IDE should be able to help you add imports in a similar way to adding them to Java classes.
Adding Components
Now it's time to add some components. In the previous article, we learned that each Scene could have only one child component. Let's add a simple label for now.
<?xml version="1.0" encoding="UTF-8"?>

<?import javafx.scene.control.Label?>

<!--Just one component on root level is allowed-->
<Label>Hello World!</Label>
Of course, having a label as the root component is not very realistic. You would usually rather use some sort of layout, which is a container for multiple components and handles their positioning. We'll cover layouts later in the series, for now, let's just use simple VBox, which arranges its children vertically one under another.
<?xml version="1.0" encoding="UTF-8"?>

<?import javafx.scene.control.Label?>
<?import javafx.scene.layout.VBox?>
<?import javafx.scene.control.Button?>

<VBox>
    <Label text="Hello world!"/>
    <Label text="This is a simple demo application."/>
    <Button text="Click me!"/>
</VBox>
FX Namespace
There is a couple of FXML elements and attributes, which are not accessible by default. You need to add an FXML namespace to make them available. This needs to be added to the root component:
<?xml version="1.0" encoding="UTF-8"?>
    ...

<VBox xmlns="http://javafx.com/javafx"      xmlns:fx="http://javafx.com/fxml">    ...
</VBox>
Now we can use some new elements from the fx namespace. Let's try adding unique ids to our components:
<Label fx:id="mainTitle" text="Hello world!"/>The fx:id attribute is a unique identifier of a component, which can be used to reference the component from other parts of our FXML and even our Controller.
Scripting
Our application is now static. We have some labels and a button, but it does nothing dynamic.
Let's react on click on our button and change its caption from Click me! to Click me again!.
The first thing we need to do is to provide onAction handler to our button.
<Button fx:id="mainButton" text="Click me!" onAction="buttonClicked()"/>Notice fx:id, this is an identifier, we'll use later to reference our Button.
Now we need to provide a function, which should be called. You can define it inside of <fx:script> tag. What's interesting is that you can use multiple scripting languages to write your script, surprisingly even JavaScript. But also Groovy or Clojure. Let's see an example in JavaScript:
<fx:script>
function buttonClicked() {
    mainButton.setText("Click me again!");
}
</fx:script>
You can see that we are referencing our Button component as mainButton, which is the id we declared using fx:id="mainButton".
You should also declare what scripting language you are using in your FXML file:
<?language javascript?>Let's see the full example:
<?xml version="1.0" encoding="UTF-8"?>
<?language javascript?>
<?import javafx.scene.control.Label?>
<?import javafx.scene.layout.VBox?>
<?import javafx.scene.control.Button?>

<VBox xmlns="http://javafx.com/javafx"
      xmlns:fx="http://javafx.com/fxml">
    <Label fx:id="mainTitle" text="Hello world!"/>
    <Label fx:id="subTitle" text="This is a simple demo application."/>
    <Button fx:id="mainButton" text="Click me!" onAction="buttonClicked()"/>
    <fx:script>        function buttonClicked() {            mainButton.setText("Click me again!")        }    </fx:script></VBox>
Should I use this?
The example above showed us how to reference components using fx:id and how to add some basic behavior using scripting. Oddly enough, in JavaScript. However, is this something you should be actually doing?
The answer is - in most cases no. There are several problems with this approach. The reason why we introduced FXML was a separation of concerns - to decouple UI structure and behavior. With this scripting, the behavior is back again together with our UI structure. What's more - since we are no longer working with Java code but rather XML, we lost all the compile-time checks and type safety. Now all the problems will occur at runtime rather than at compile time. That's very fragile and error-prone.
Adding Controller
So what can we do to have a clean separation of concerns? We can link a Controller to our FXML file. It is a Java class, which is responsible for handling all the behavior and user interaction. Now we gained back our type safety and compile-time checks.
Your controller is a POJO, it does not need to extend or implement anything nor have any special annotations.
How do we link the controller class with our FXML though? There are basically two options.
In Java
You can instantiate your controller yourself (or use any other means of obtaining the instance such as Dependency Injection to obtain). Then simply assign it to your FXMLLoader.
FXMLLoader loader = new FXMLLoader();
loader.setController(new MainSceneController());
In FXML
You can specify the class of your controller as fx:controller attribute, which needs to be on the root component.
<VBox xmlns="http://javafx.com/javafx"
      xmlns:fx="http://javafx.com/fxml"
      fx:controller="com.vojtechruzicka.MainSceneController">    ...
</VBox>
If you declare your Controller class in FXML, it is automatically instantiated for you. This brings one limitation to this approach - you need to have no-args constructor in your Controller so that it can be easily instantiated.
To obtain the auto-instantiated Controller instance, you can get it from your FXML Loader:
FXMLLoader loader = new FXMLLoader();
loader.setLocation(getClass().getResource("/mainScene.fxml"));
MainSceneController controller = loader.getController();
Calling Controller methods
Now, when we have our controller, we can remove our script and have our button-click logic directly in our controller.
public class MainSceneController {

    public void buttonClicked() {
        System.out.println("Button clicked!");
    }
}
The next step is to register this method call as a handler for onAction event of our button. To reference methods from our controller, we need to use # before the method name:
<VBox xmlns="http://javafx.com/javafx"
      xmlns:fx="http://javafx.com/fxml" fx:controller="com.vojtechruzicka.MainSceneController">
    <Label fx:id="mainTitle" text="Hello world!"/>
    <Label fx:id="subTitle" text="This is a simple demo application."/>
    <Button fx:id="mainButton" text="Click me!" onAction="#buttonClicked"/></VBox>
When we click our button, it will call MainSceneController.buttonClicked(). Keep in mind that this reference works only if the method is public. If the access modifier is stricter, you need to annotate the method with @FXML annotation.
@FXML
private void buttonClicked() {
    System.out.println("Button clicked!");
}
Injecting components to Controller
So far we're just printing to the console. What if we want again to change the text of our button to Click me again!? How can we get references to components in our Controller?
Fortunately, it is easy. Remember these fx:id attributes?
<Button fx:id="mainButton" text="Click me!" onAction="#buttonClicked"/>JavaFX tries to automatically map components with fx:id defined to fields on your controller with the same name.
Assume we have the button above with fx:id="mainButton". JavaFX tries to inject this button object to your controller to field with name mainButton:
public class MainSceneController {

    // Here is injected component with fx:id="mainButton"
    @FXML
    private Button mainButton;

}
Same as with methods earlier, your fields need to be either public or annotated with @FXML.
Now when we have a reference to our button, we can easily change its text:
public class MainSceneController {

    @FXML
    private Button mainButton;

    @FXML
    private void buttonClicked() {
        mainButton.setText("Click me again!");
    }
}
Scene Builder
Writing your GUI structure in XML may be more natural than in Java (especially if you are familiar with HTML). However, it is not very convenient still. The good news is that there is an official tool called Scene Builder to help you with building your UI. In a nutshell, it is a graphical editor for your GUI.
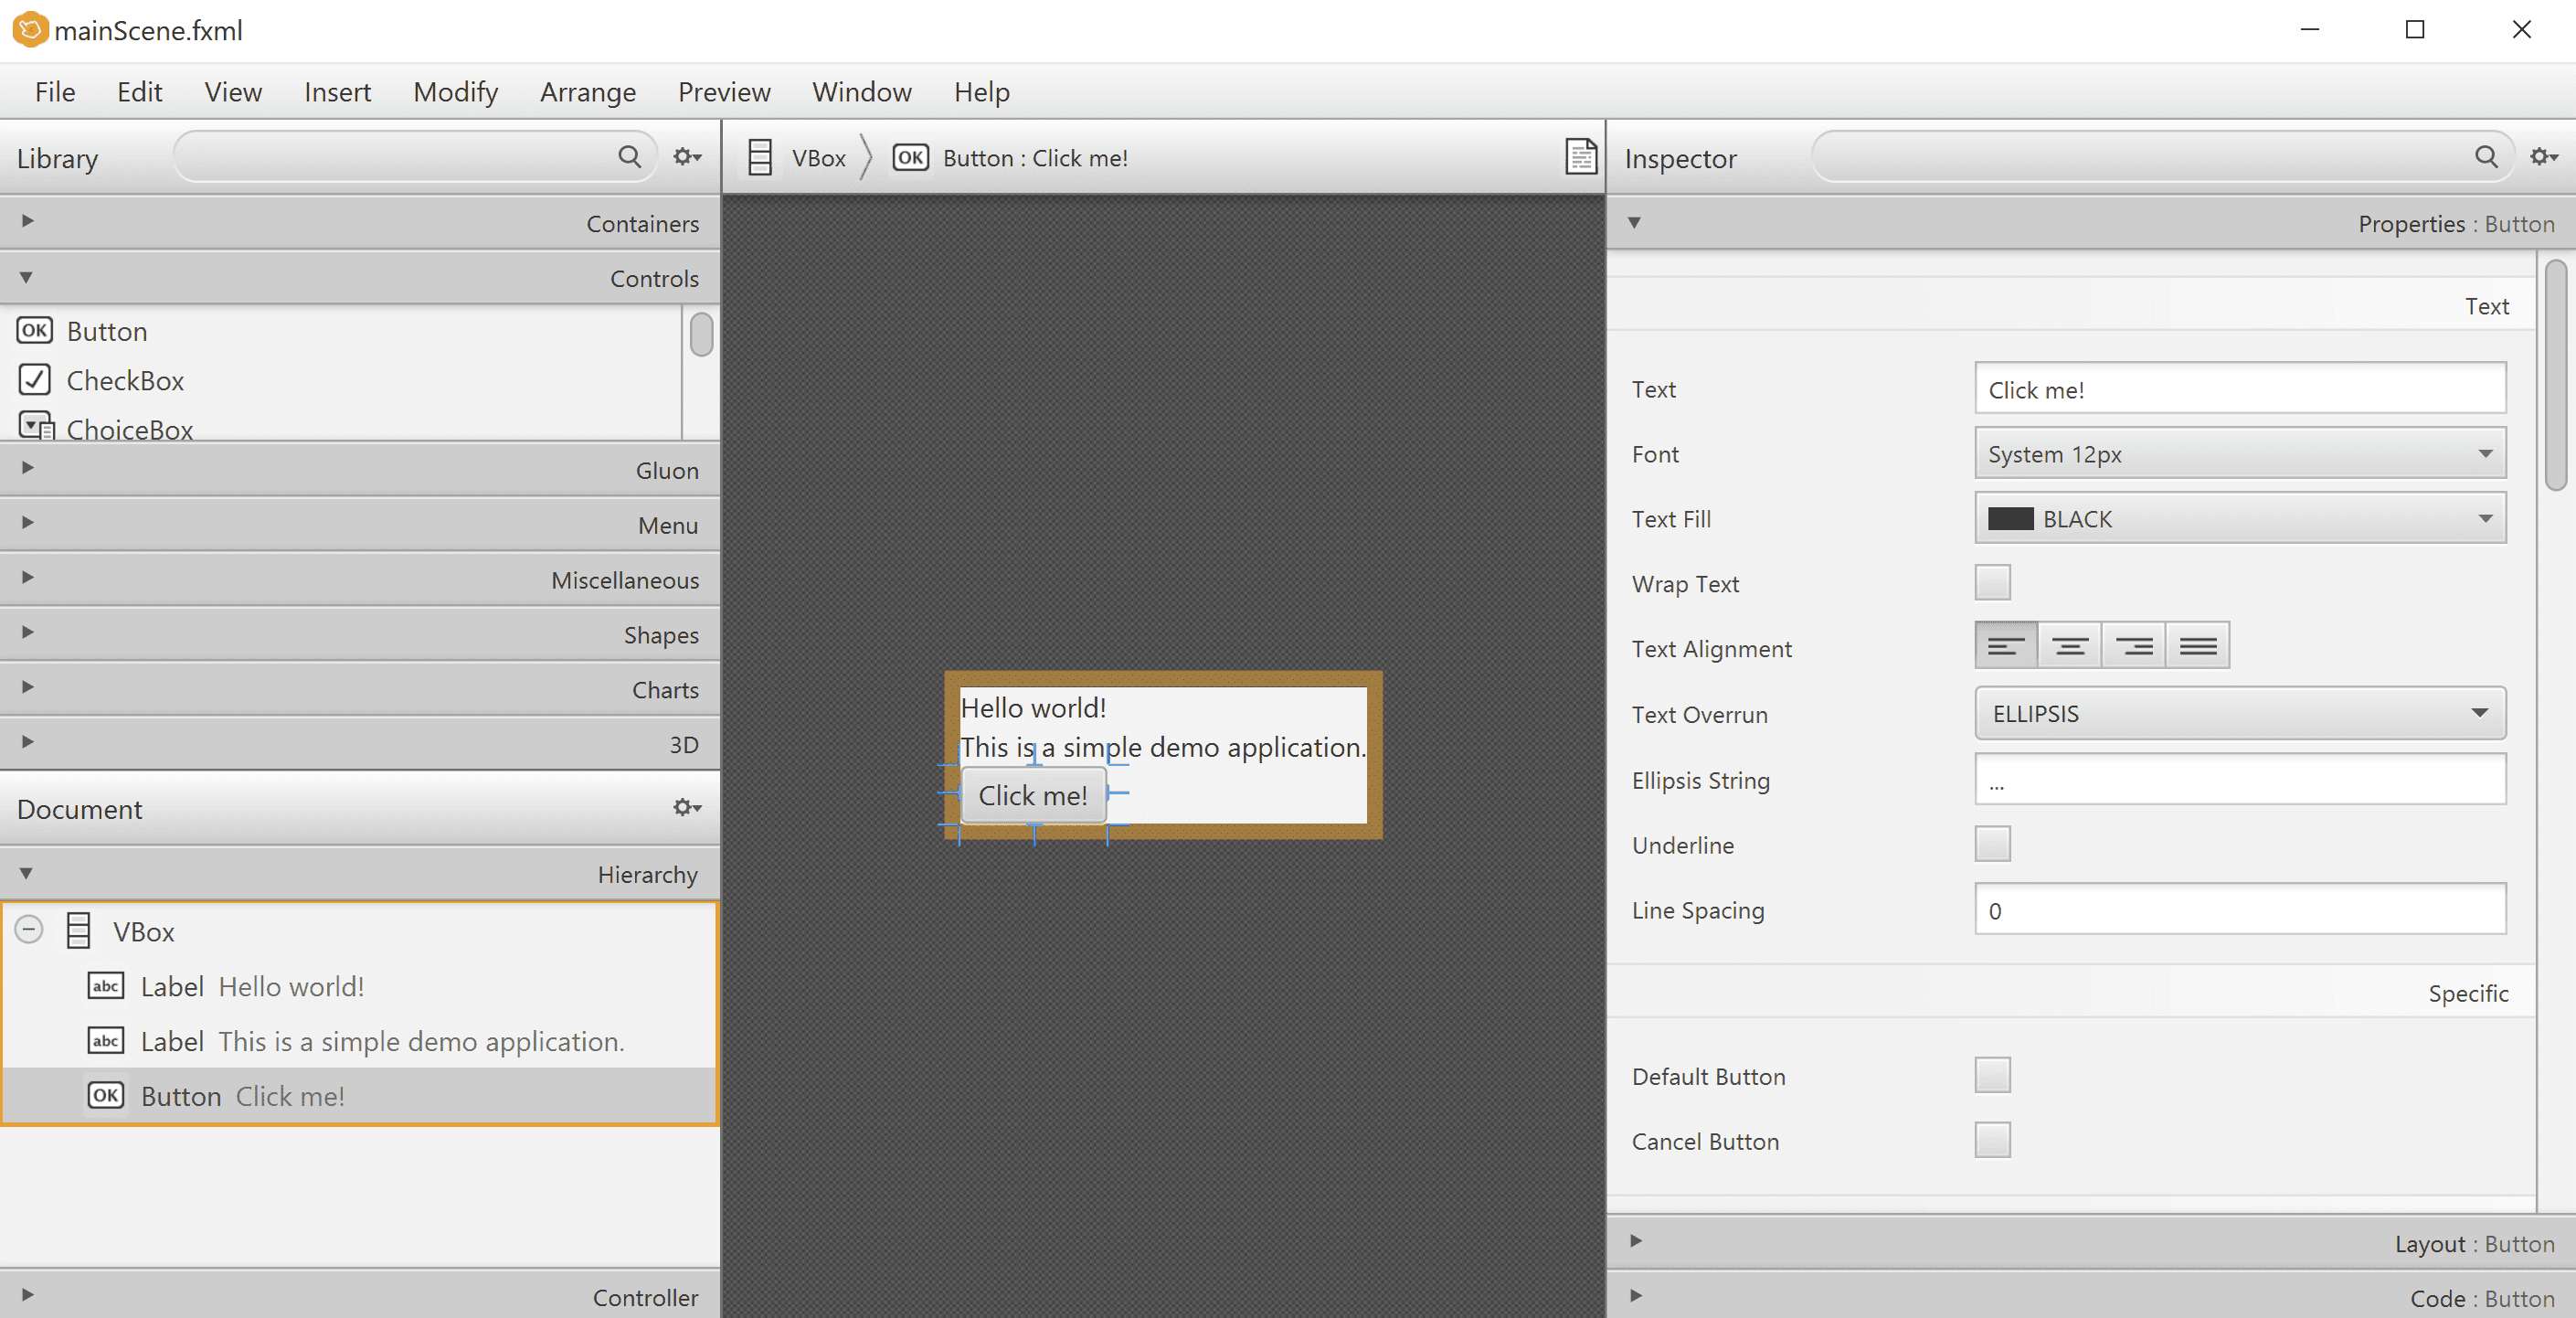
There are three main sections of the editor.
- The left part shows available components, which you can drag and drop to the middle part. It also contains the hierarchy of all the components in your UI, so you can easily navigate it.
- The middle part is your application rendered based on your FXML file.
- On the right there is the current component inspector. You can edit various properties of the currently selected component here. Any component you select from the middle part of the hierarchy is shown in the inspector.
Standalone
Scene Builder can be downloaded as a standalone application, which you can use to edit your FXML files.
IntelliJ IDEA integration
Alternatively, Scene builder offers IDE integrations.
In IntelliJ IDEA, you can right-click any FXML file and click Open in SceneBuilder.
Alternatively, IDEA integrates SceneBuilder directly in your IDE. If you open an FXML file in IDEA, there are two tabs at the bottom of the screen
- Text
- SceneBuilder
For each such file, you can easily switch between editing your FXML file directly or through SceneBuilder.
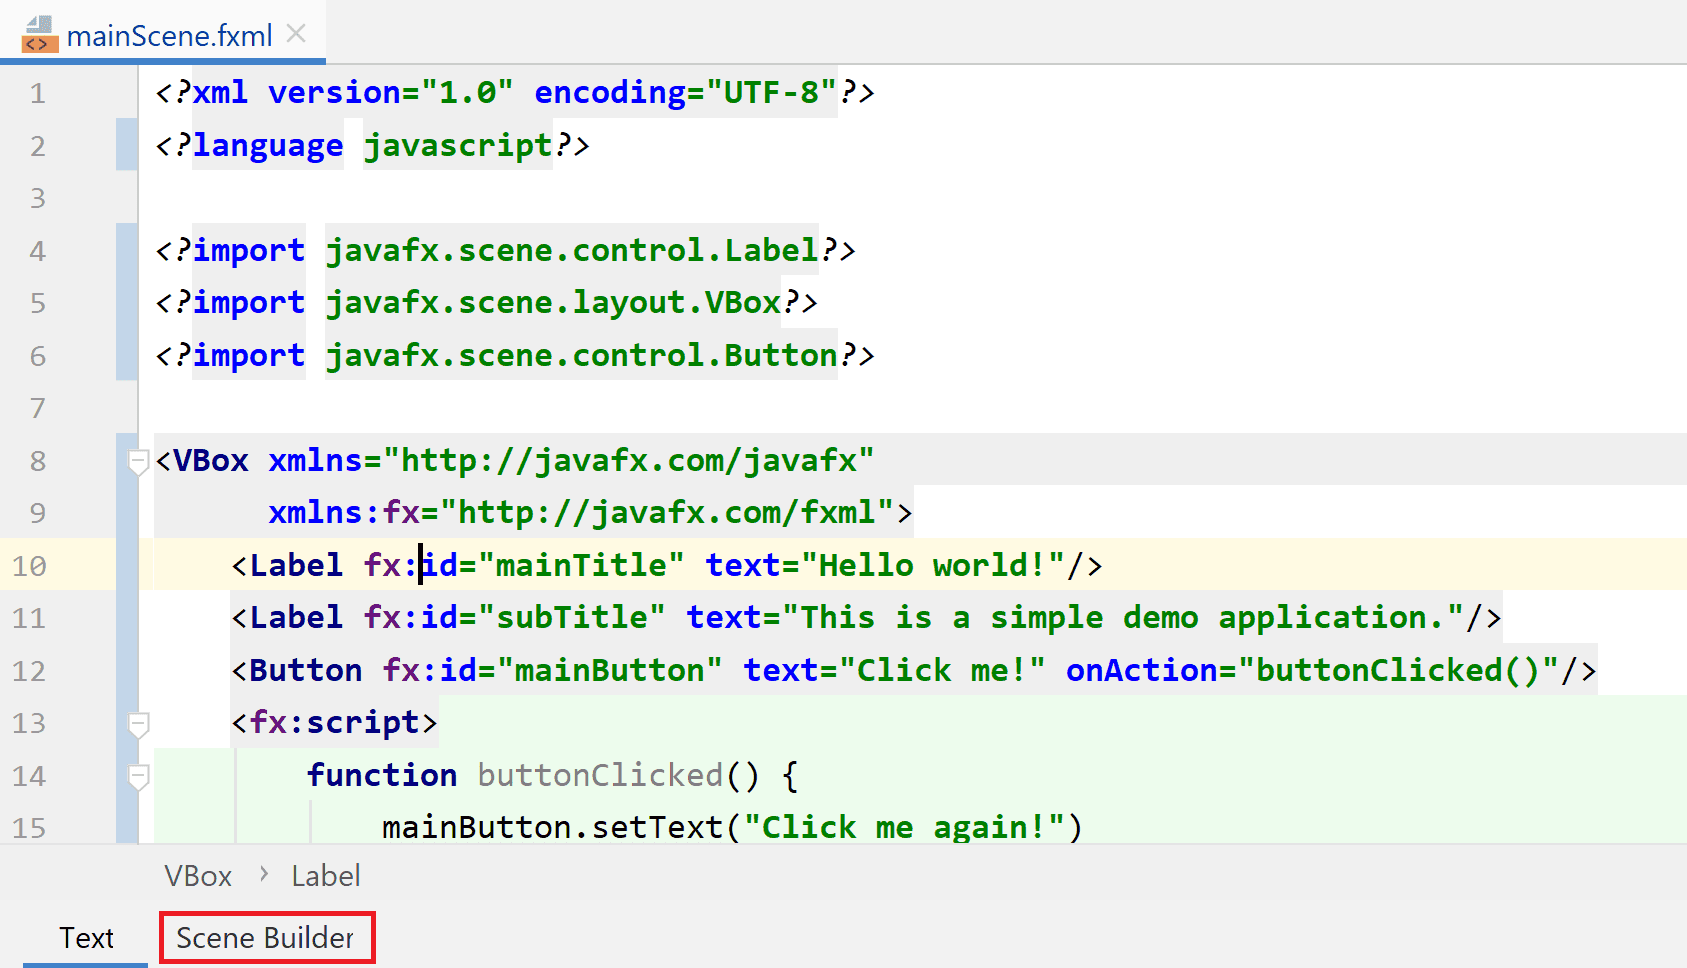
You can configure the location of SceneBuilder executable in:
Settings → Languages & Frameworks → JavaFX → Path to SceneBuilderWhat's next
In the next post in our series, we'll cover some basic layouts we can use to organize our GUI components.
