


JAM Stack Migration - Part 2
Recently I managed to finally get rid of WordPress and migrate my blog to JAM Stack, built with a static site generator called GatsbyJS. I described what JAM Stack is, how I migrated and how great Gatsby is in my previous post - Migration to GatsbyJS and JAM stack from WordPress.
This second post describes build and deployment process and how much it is better than the original WordPress setup or traditional GitHub Pages.
GitHub Pages?
Leaving managed WordPress saved me some expenses, but the next question was where to deploy instead. The first obvious option was GitHub Pages. It is a free service provided by Github, which nicely integrates with your GitHub repository. If you are using Jekyll as a static site generator, it offers good integration out of the box.
While GitHub pages are good and will do the job, there is one service, which is in my opinion much better. It offers much more while keeping the simplicity. It's called Netlify. This blog post provides a useful comparison of GitHub Pages and Netlify.
Netlify to the rescue
All right, Netlify has many nice features, let's dig a bit deeper.
Simple Setup - Continuous Deployment
What I love about Netlify is its simplicity. It can take just a minute to set up continuous deployment from your git repository.
1. You create a Netlify account by authenticating using you GitHub, GitLab or BitBucket accounts.
2. You select which git provider (GitHub, GitLab, BitBucket) you want to use.
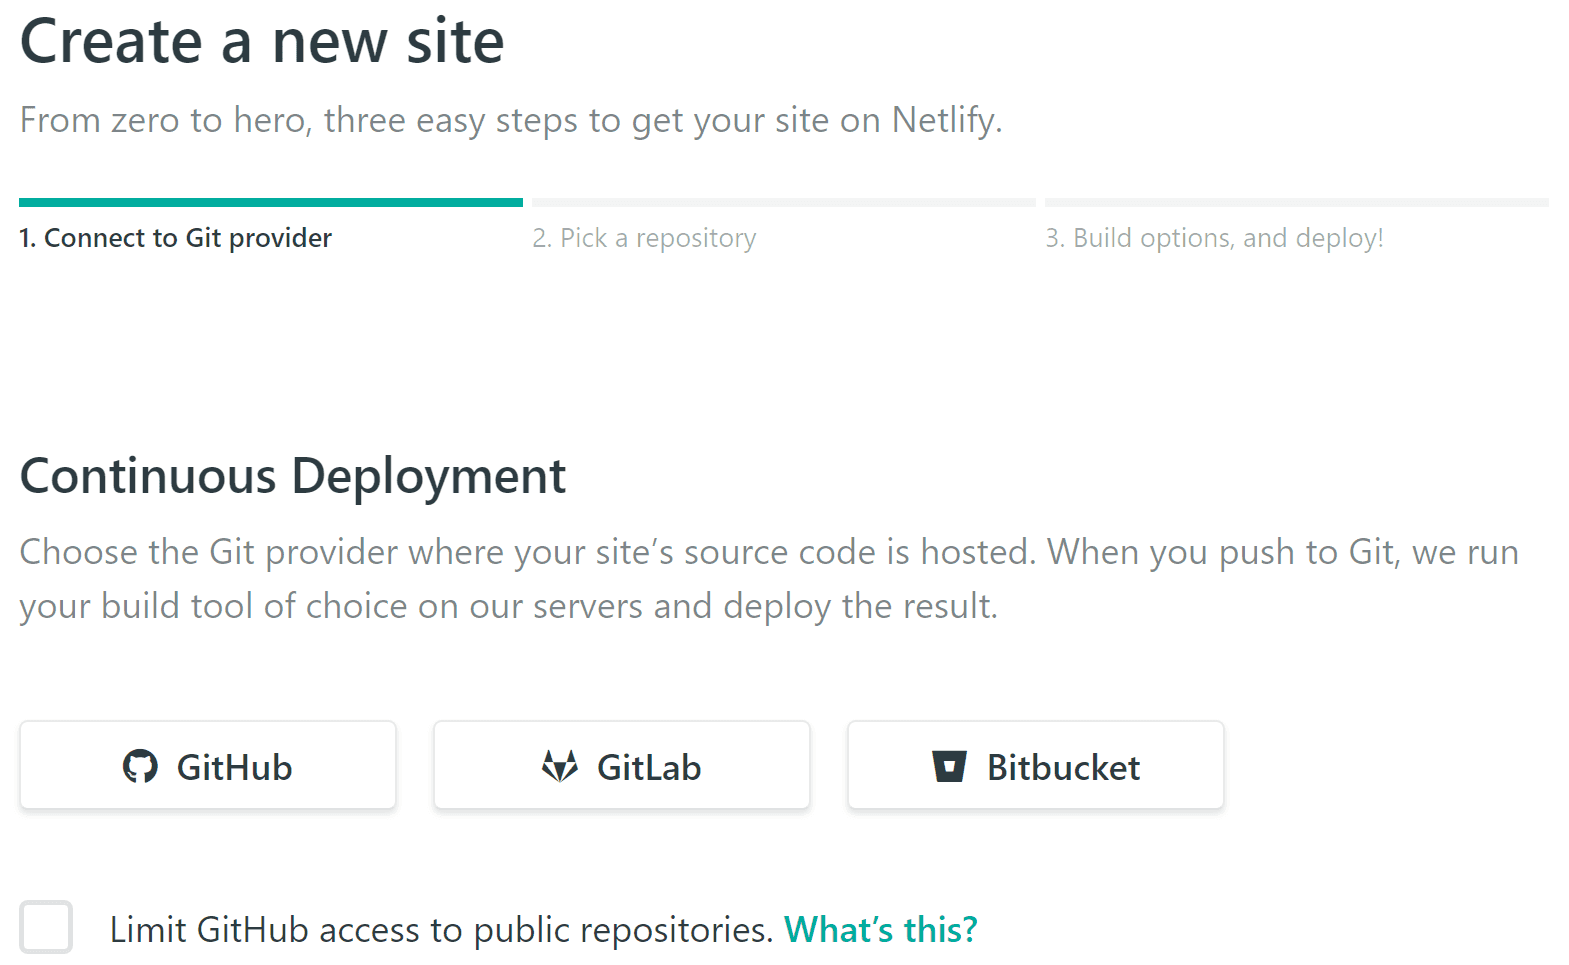
3. Then you select a repository you want to deploy to Netlify.

4. You select a build command (e.g. gatsby build) and the default branch to build from. Netlify is usually able to prefill this for you by detecting your static code generator from your repo's code.
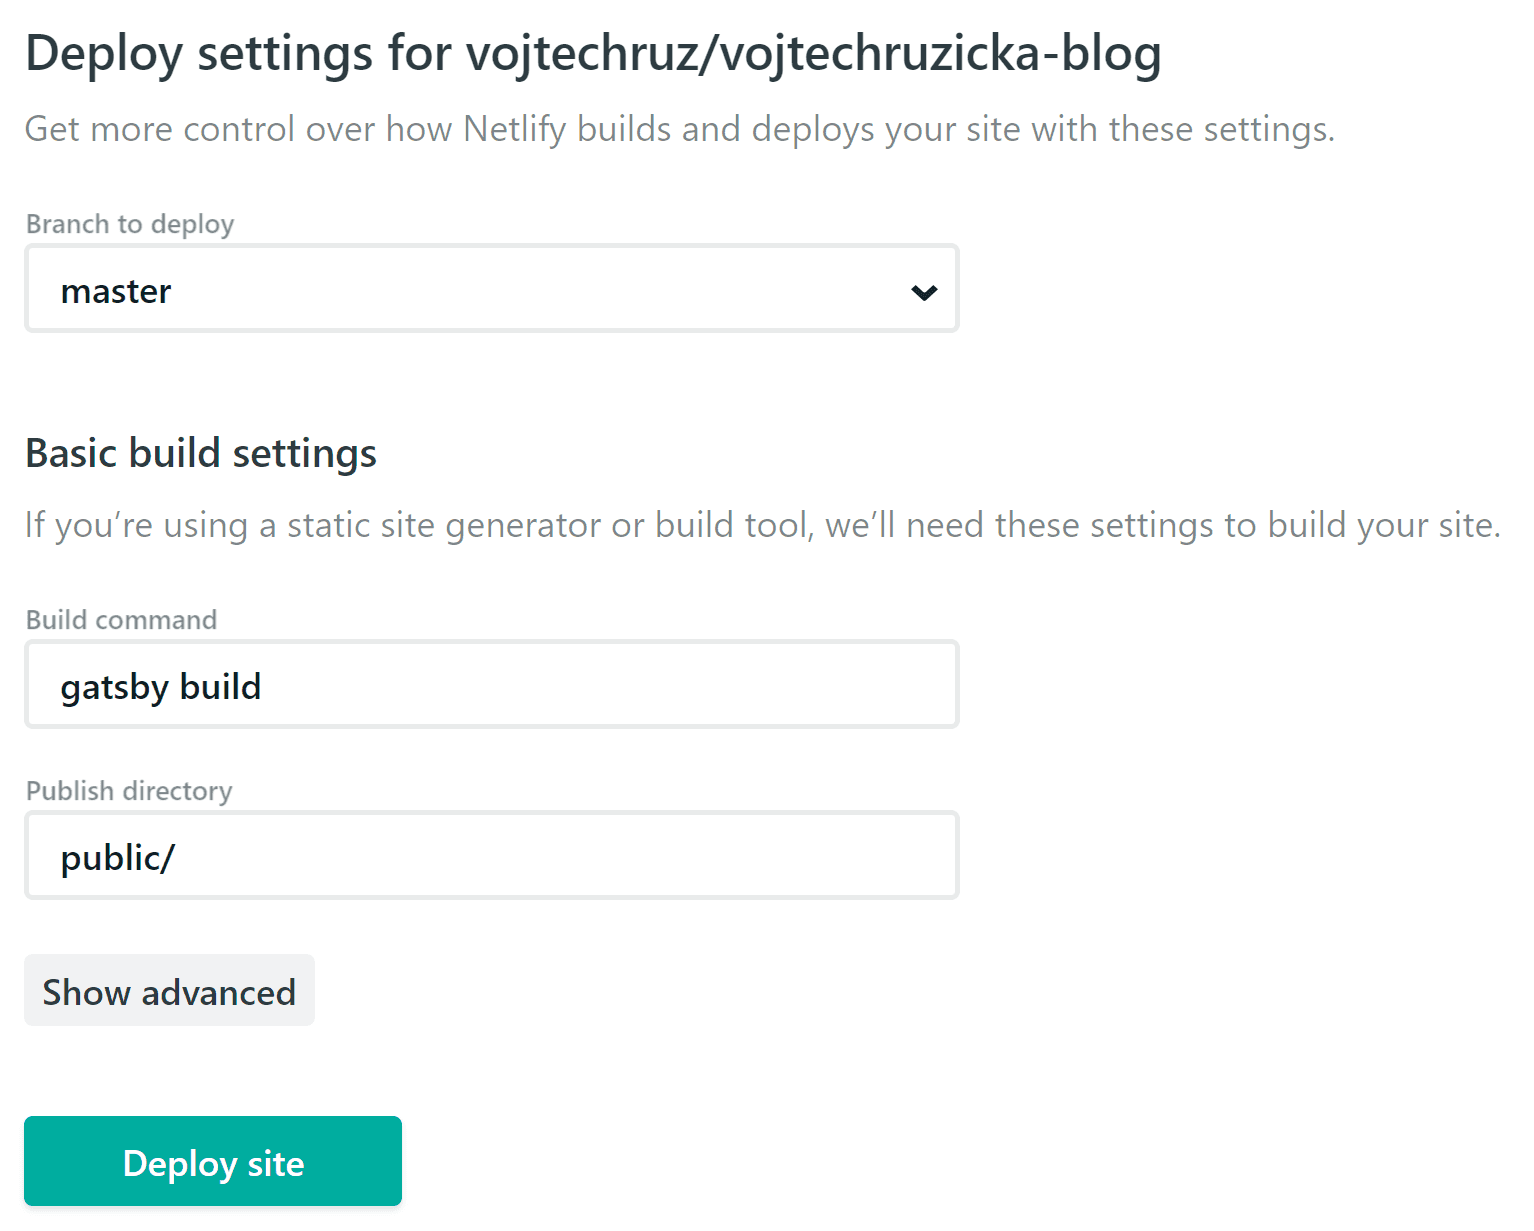
That's all the setup needed to get up and running. Now Netlify builds your code and publishes it. In some cases, it is all you need. From now on, every time you push new changes to the branch configured above, Netlify builds a new version of your pages using the command provided. Then it deploys this new version and invalidates all the caches. It still keeps the older versions so you can quickly switch to them if anything goes wrong.
If you have a custom domain, you can easily use your own domain name instead of yoursite.netlify.app. After this, you can also add HTTPS with just one click (see below).
Content Delivery Network
One of the weaknesses of my previous WordPress setup was performance. The problem was two-fold. First - having a PHP backend generating and serving my content is way slower than just serving a static HTML page. Static site generators such as GatsbyJs or Jekyll solve this issue. The second problem still remains. If you have just one central server distributing your static pages, the latency increases with the distance of your clients from the central server. Having someone connecting from the other end of the world causes a serious performance hit. What's more, you have a single point of failure. If your central server goes down, your content is not served.
Content Delivery Network (CDN) solves this issue. CND offers many nodes distributed in various geographic locations. When you are requesting a resource from a CDN, you are served from the node which is geographically closest. Moreover, if one of the nodes goes down, the traffic is redirected to the next one. Since your static site is not changing until the next build, it is easy to scale and distribute your whole site over a CDN. Netlify does this out of the box, utilizing multiple intelligent ultra-fast CDNs based on multiple providers. That means a tremendous performance and reliability gain over the original WordPress solution. What's more, Netlify's logic layer on top of the CDN allows instant cache invalidations, rollbacks or custom redirect, rewrite or proxy rules.
One click HTTPS
Having a secure HTTPS connection enabled on a site like a blog, where no sensitive data is transferred, may seem a bit pointless. However, there are several good reasons to use HTTPS anyway.
First of all, sites using HTTPS get a ranking boost in search results on Google. That means your site is displayed above the similar sites not using HTTPS, which can bring much traffic. Moreover, Google Chrome is going to show "Not Secure" on all the pages not using HTTPS soon enough, which can scare off your visitors. When running over HTTP, you also risk public networks injecting content and advertisements into your pages, which can ruin user experience and lead to loss of users.
If you want to use HTTP/2 and enjoy its benefits such as increased performance, you need to migrate to HTTPS. Netlify utilizes Let's Encrypt - a free, automated, and open Certificate Authority.
Deploy preview per branch
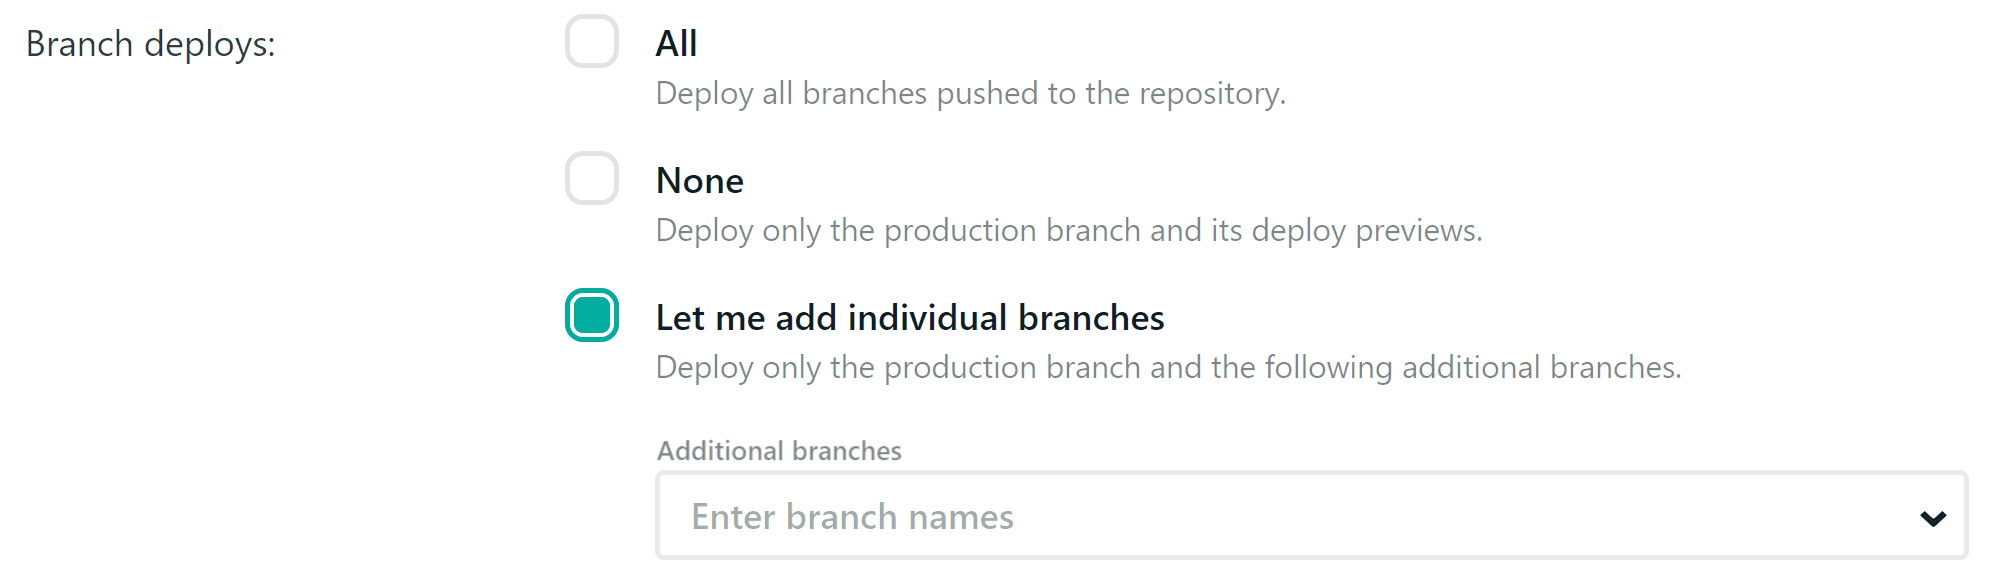
By default, Netlify deploys only changes in one configured branch. However, you can configure it to extend this behavior to multiple branches or even to all of them. In such case, whenever you make changes in such branch, Netlify builds and deploys your pages, but not to your primary domain. Instead, it creates a custom domain just for your branch, where you can check how your site works before going public. You can share it with others to gather feedback on your new version, perform testing and so on. It is handy as you can test your site in a production-like environment before actually publishing it. No more "It works on my machine" excuses.
A/B testing and private betas
Split Testing is one of the cool features, which are so simple to set up on Netlify but hard otherwise. You can configure multiple branches in your repository and set that certain percentage of users is redirected to builds of specific branches.
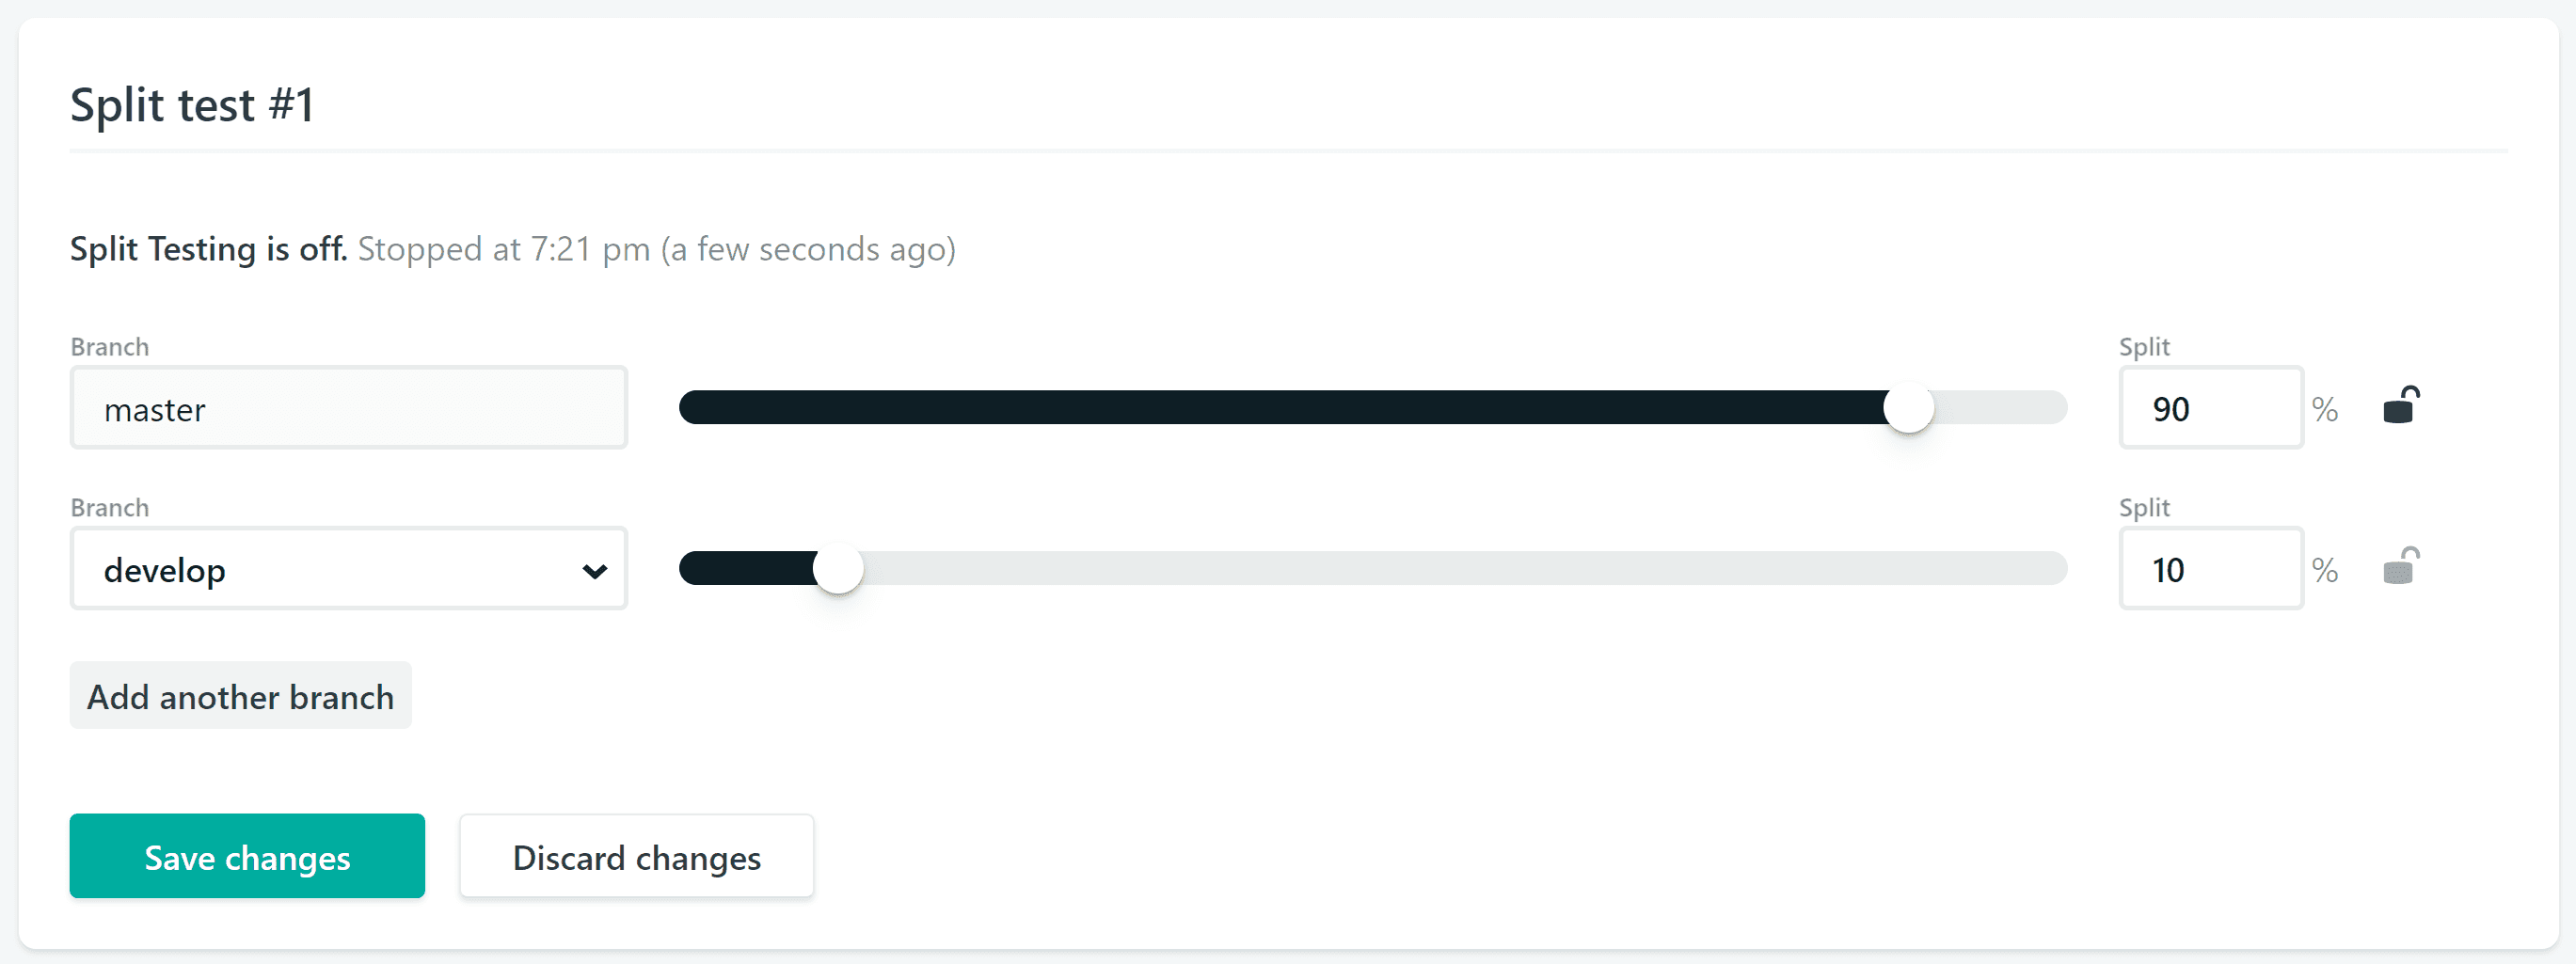
It can be very useful. You can use analytics to perform A/B testing and determine which version of your site is more effective. You can roll new changes just to a fraction of your users, make sure everything is ok and only then publish the new version globally. You can even do private betas.
Integration with a CMS
WordPress does not only serve your content, but it is also a Content Management System, of course. It may sound like a good idea, but it comes at a price, which is mainly a performance hit. Switching to a static site means much better performance, but you no longer have a nice integrated CMS.
Fortunately, there is plenty of them, which you can use for your JAM Stack static site. Moreover, having decoupled creation and serving of content is very powerful. Also, because you are using git for your site, you can easily utilize its power to achieve scenarios such as editorial workflow, where articles are created as drafts and then need to be approved before publishing. So all is version controlled with all its advantages.
You can use any CMS you want, but if you want to stick with Netlify, you can utilize its Netlify CMS, which is also available as a GatsbyJs Plugin.
UPDATE: Netlify Analytics
One of the new features recently introduced is Netlify Analytics. All the data is captured on the server, so there is no performance hit from downloading and executing client-side analytics, no extra requests. It works even with adblockers and disabled Javascript. You can read a full review in the following post:
Netlify Analytics Review: Google Analytics alternative?
Oct 11, 2019


And much more
Features above make Netlify such a great and powerful tool, yet easy to use. Netlify, however, offers much more. These more advanced, features are not needed for my simple use case of a personal blog, but they can be valuable in other cases.
Netlify provides support for effortless form submission integration without the need to provide your own backend. Another cool feature is identity management. Netlify provides you with easy integration of processes such as registration, login or account recovery. You can even enable an authenticated user to call third-party services.
You can define redirects, which can be useful when migrating from an existing solution with a different content structure as I did. You are able to even define custom HTTP headers to be returned. When using single page applications, you can turn on pre-rendering of your content for search engine crawlers. Your app then looks just like ordinary HTML site instead of SPA, which can be beneficial for SEO.
The last but not least is a powerful integration of AWS Lambda functions. Everything is managed through Netlify, so you are shielded from coordinating the deployment of your app and server-side functions. No need to worry about service discovery or API gateway configuration. How cool is that?
Conclusion
Migrating to a static site generator such as GatsbyJs is a first (and essential) step. Then, however, you need to figure out how and where to build and deploy your site. Netlify is very easy to use, yet powerful solution offering great performance and user experience. Moreover, for most scenarios (such as my blog) it's completely free.
