


When printing a web page, is it important to adjust the layout and the content of your page. Many elements are not relevant for printing, it is vital to properly control page breaks and handle hyperlinks. All of this can be controlled by CSS and you can even trigger printing in Javascript or react to user print action. Let's learn how.
Adding print stylesheet
When you want to apply certain CSS rules just when printing, you can easily add a separate stylesheet, which will be used just for printing purposes.
<link rel="stylesheet" media="print" href="printing-stylesheet.css">If you add your stylesheet this way, it will be applied in addition to your regular stylesheet. This is often what you need. However, if you would like to have two distinct stylesheets - one only for the screen, one just for printing, you can achieve it like this:
<link rel="stylesheet" media="screen" href="screen-stylesheet.css">
<link rel="stylesheet" media="print" href="printing-stylesheet.css">
Having separate stylesheet just for printing can be useful, if you want to load it dynamically, only when needed, or you prefer your print styles to be completely separated.
Media queries
A more modern way of including print-specific CSS is using media queries.
You can define that a certain set of CSS rules can be applied only when printing.
@media print {
  ...
}
Or only when using a screen.
@media screen {
  ...
}
This approach may be preferred to separate print stylesheet as you can easily have regular and print CSS for a page/component in the same place. This makes the maintenance easier, and it is less likely that you will forget to update printing styles when making changes to regular styles.
Check your CSS framework
If you are using external CSS styles, for example, a framework such as Bootstrap, you should first check its print support.
Bootstrap, for example, provides some support out of the box - it does hide navigation bar and so on.
Removing unnecessary content
Web pages contain a lot of content, which is not really useful when printing. This can be:
- Navigation bar
- Social share buttons
- Media content such as video or audio
- Cookie and subscription toolbars
- Ads
And much more. It is useful to remove this content for printing. This way, your users save paper, ink, and the output is easy to read and not cluttered.
It is easy to hide elements by setting display:none;:
@media print {
  .navigation {
    display: none;
  }
}
Of course, you can do any adjustments necessary such as reducing size, changing fonts, simplifying graphics - pretty much anything you can do in CSS.
Page Margins
When printing, it may be useful to override the default settings for margins of your pages (for example, to provide space for writing notes).
@page {
  margin: 20mm;
}
Of course, you can set individual margins separately. This can be useful when printing double-sided documents. That's because when you want to bind your documents together, you need extra space for better readability. However, with double-sided pages, this space is either on the left or right of the page, depending on whether it is odd or even.
Fortunately, you can select odd and even pages by @page:left and @page:right. Left here means left-facing page, and right is right-facing.
@page:left {
  margin-right: 30mm;
}

@page:right {
  margin-left: 30mm;
}
If you want to treat the first page separately, you can use @page:first.
Page breaks
For better readability, it can be useful to control where page breaks are inserted.
Avoiding breaks
It can be inconvenient if images or code examples get split across two pages. Fortunately, you can ensure that certain elements will never be split. Let's say we want to do that for images and code blocks:
img, pre {
  break-inside: avoid-page;
}
You can also specify that page break should not be inserted before or after an element. This can be useful, for example, so that heading is not placed as the last element on a page and is not separated from the following paragraph.
h1, h2, h3 {
  break-after: avoid-page;
}
Explicit breaks
Sometimes, it can be useful to explicitly insert page breaks before or after certain elements.
For example, you may need each chapter to start on its own page. You can achieve it using break-before on your chapter heading.
h2 {
  break-before: page;
}
You can also insert page breaks after an element using break-after.
Paragraph splitting
Fortunately, you do have fine-grained control over how paragraphs get split to the next page. We have two properties for this - widows and orphans. The naming may sound weird, but that's because it originates from typesetting.
Orphans
When a paragraph gets split over two pages, orphans property defines how many lines at a minimum should be kept on the first page.
p {
  orphans: 4;
}
Widows
This is very similar to orphans. It is the minimal number of lines, which should be on the second page when a paragraph is split on two pages.
p {
  widows: 5;
}
Because of the unusual naming, it can be difficult to remember the difference between widows and orphans and which is which. You can use the following mnemonic:
An orphan starts alone, a widow ends alone.
Note that the browser is not 100% guaranteed to follow these rules when printing. It can decide to break this rule in favor of some other printing optimizations.
There is a good browser support (as of 4/2020) for widows and orphans, 93.76%, except for Firefox.
Hyperlinks
You should take extra care when handling printed hyperlinks. Many pages these days don't use underline for hyperlinks and rather differentiate links by color. This is not very convenient when printing, especially with black and white output. Marking hyperlinks with underline is a good traditional way of recognizing them even when printing.
@media print {
  a {
    text-decoration: underline;
  }
}
Another problem with hyperlinks is that in a printed document, there is no way to determine where the link is pointing to. Fortunately, this can be fixed with just a little bit of CSS.
a:after {
   content: " (" attr(href) ") ";
   font-size: 80%;
}
This includes URL after each a element, so you can clearly see where it is pointing to. The URL is a bit smaller than the regular text for better readability. Here's how it looks:

This is good, but we can do even better. The first issue to solve is to make sure only links in text are processed, not all the links on the page. We can prefix the a selector in our code with p. Or better yet, with the container for our page text, such as #page-content (or whatever name you might have).
The second improvement can be restricting this to only external links. We can do this by selecting only a tags where href starts with http:
#page-content a[href^="http"]:after {
  content: " (" attr(href) ")";
  font-size: 80%;
}
This solution works, but if you have many links, especially with long URLs, it can become hard to read. There is an alternative solution described by Aaron Gustafson.
The idea is not to put URL after each link, but rather a reference number (1,2,3,...) and then at the end of the document provide a reference table with all the number and their URLs. It also covers cases where a link is present more than once - in such situations the duplicate links share the same number.
This also involves a bit of JavaScript, but it can be handy when working with a lot of links. Here's an example of this approach in action:

Page Margin Boxes
When printing web pages, browsers can include various information in the headers and footers of each page, such as:
- Page numbers
- Page title
- Origin URL
Currently, you do not have control over this content. Fortunately, this is about to change. There is a specification CSS Paged Media Module Level 3, which addresses this issue.
This can be useful for adding information such as copyright, page logo, custom page counters, etc.
There are 16 regions, which you can target:
- 4 corners of the page
- 3 regions at each edge (top, bottom, right, left)
For example, if you want to target the bottom of the page, you can choose from
bottom-left-cornerbottom-right-cornerbottom-leftbottom-centerbottom-right
Let's look at a specific example.
@page {
  @top-center {
    content: "Vojtech Ruzicka's Programming Blog";
  }
  @top-right-corner {
    content: url(logo.png);
  }
  @bottom-right {
    content: "Page " counter(page)
  }
}
You can specify not only content, but also additional properties such as fonts or borders:
@page {
  @top-center {
    content: "Vojtech Ruzicka's Programming Blog";
    font-family: sans-serif;
    font-weight: bold;
    font-size: 2em;
  }
}
The specification is currently in the Editor's Draft stage (as of 4/2020) and currently no browsers support adding custom headers and footers. Hopefully, this will change in the near future. You can track the corresponding Chrome issue. The older parts of this specification are already implemented (such as setting page margins), but custom content for margin boxes is yet to come.
Handling printing in JS
With JavaScript, you don't have to rely on your users to initiate the printing of your page. You can trigger it yourself using:
window.print();You may be tempted to use your own print button if you need to perform some custom JS logic before printing - such as manipulating DOM, loading new data, and so on.
The problem is that you cannot guarantee that users will use your button instead of native browser printing.
For such cases, where you need to perform some custom logic before (or even after) printing, there are two handy events.
As the name suggests, the first one is fired before you enter the print dialog, so you can do whatever is necessary. The second one is triggered after the printing finishes, and you can use it for reverting to the original state.
You can register your event listeners like this (of course, this may be different if using a framework):
window.onafterprint = (event) => {
  console.log('Printing finished!');
};
It is usually preferred to do as much as possible in CSS, but sometimes using JS may be necessary.
Dev Tools Print Preview
It can be time-consuming to open print preview dialog in your browser whenever you make changes and want to check how your page looks when printing. Fortunately, in Developer Tools, you can easily emulate how the page would look like when printing without triggering he print dialog.
Chrome
In the Chrome Devtools you can switch to print view:
- Open your Devtools
- Press or Ctrl+Shift+P (or ⌘+⇧+P on Mac)
- Search for
rendering - Select
Show Renderingand press Enter
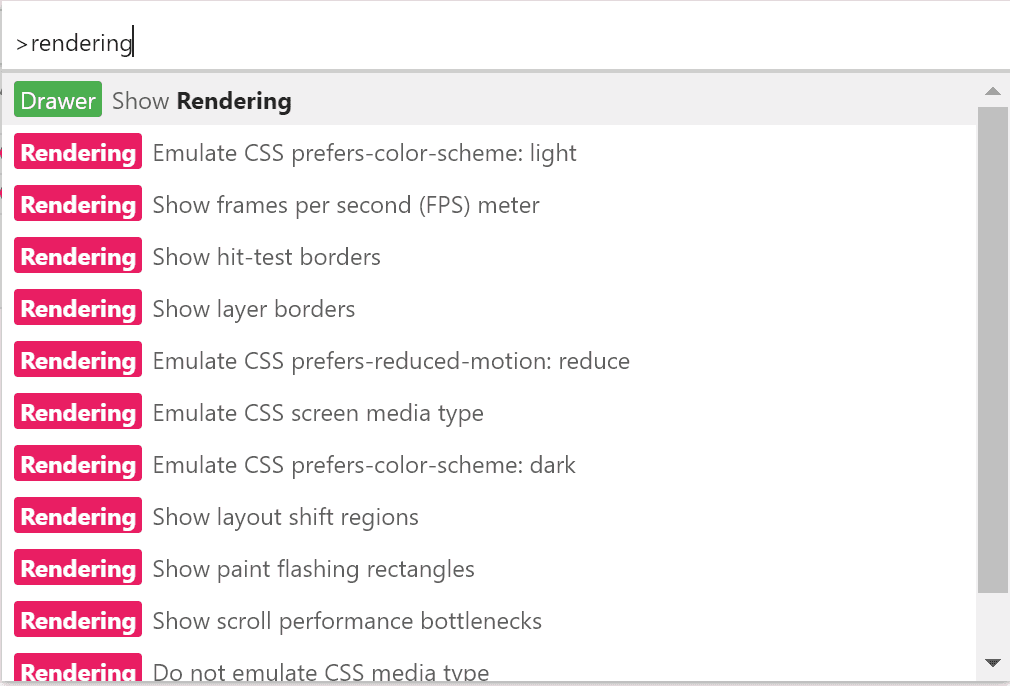
A new Rendering window should appear.
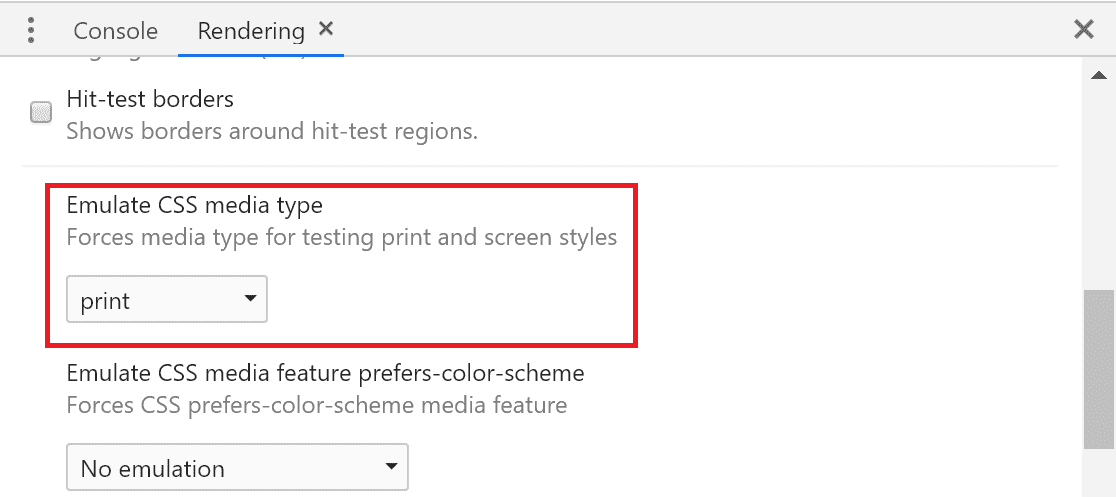
Here you can select:
Emulate CSS media type → printAlthough not related to printing, you can emulate some more interesting rendering options in this tab, such as whether the user prefers a light or dark theme or reduced motion, you can show FPS and more.
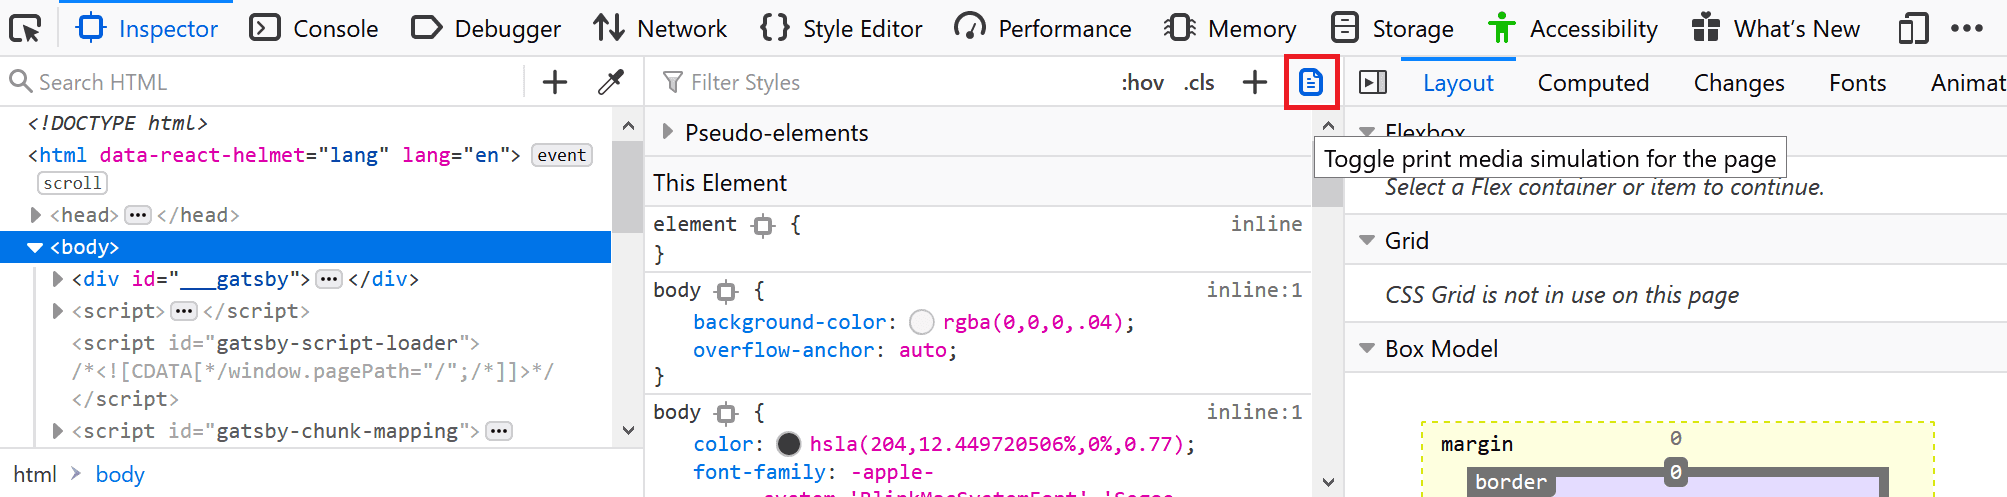
Firefox
In Firefox, you need just to click the Toggle print media simulation for the page button marked in red in the following image.
Conclusion
Printing support is often overlooked and not implemented at all. Many users still print web pages, and you should take care to design your pages to be printer-friendly. It is usually not that hard, but it can greatly enhance the user experience and usability of your site.
Even if users are not printing your pages on paper, they can print them to PDF so that they can read them later offline on their tablet or ebook reader. For these cases, print stylesheets are also useful.
